BixGrow: Affiliate Marketing
Install on ShopifyHomepage
  • WHAT'S NEW
  • BIXGROW INTRO
    • What is BixGrow?
    • How to install BixGrow
    • Common Terms
  • AFFILIATE PROGRAMS
    • What is an affiliate program?
    • Create a program
    • Select products to be applicable for commissions
    • Special product commission
    • Lifetime commission
    • Other advanced commission rules
    • Royalty
    • Commission priority
    • Commissionable sales
  • AFFILIATES
    • Invite/Add/Import affiliates
    • Use the Sign-up page
      • Customize sign-up page
      • Multiple sign-up pages
      • How to disable or limit user to sign up
    • Manage Affiliates
      • Approve/Deny/Delete an affiliate
      • View affiliate profiles
      • Move affiliates to another program
      • Export affiliates
    • Log in to an Affiliate dashboard
  • MOTIVATE AFFILIATES
    • Bonus for outstanding performances
    • Level up for higher commissions
  • AFFILIATE LINKS
    • How does affiliate link work?
    • Manage affiliate links
      • Default affiliate link
      • Product link
      • Custom link
      • Auto-shortened link
    • Track affiliate link clicks
    • Add UTM to affiliate links
  • COUPONS
    • Affiliate Coupon
    • Auto-applied coupon at checkout
    • Auto-generated Coupon
    • Assign/Delete Coupon
    • Allow affiliates to edit coupon codes
  • CONVERSIONS
    • Add/Approve/Deny a conversion
    • How conversions are tracked
    • Auto-adjustments for returns and refunded orders
    • Automated Shopify tags for referral orders
    • Prevent affiliate commissions for self-purchases
    • Reports
  • PAYOUTS
    • Add payment methods
      • How to add payment methods
      • What are commission payment statuses and how to check
    • How to make payments: A-Z
      • Manual Payment
      • In-app Payment
      • Generate/review/edit/delete/export payouts
      • VAT & Tax
  • BRANDING
    • Add your brand information
    • Change your Sender Email
    • Custom Domain
  • PROMOTE YOUR PROGRAM
    • Build your affiliate network with Multi-level Marketing
    • Let potential affiliates find you via BixGrow Marketplace
    • Post-purchase Pop-up
  • AFFILIATE PORTAL
    • Customize your affiliate portal
    • Display your affiliate portal on the storefront
    • Embed your affiliate portal into the store
    • Guide affiliates with Program Directory
    • Languages
    • Promotional materials
    • Privacy
  • OTHER SETTINGS
    • Notification for you
    • Toolbars
    • Integration
      • Klaviyo
      • Mailchimp
      • PayPal
    • Staff accounts
    • Advanced
  • REFERRAL
    • What is a Referral Program?
    • Set up your program
      • Rewards
      • Settings
    • Attract advocates to sign up for your program
      • Widget
      • Custom Page
      • Post-purchase Pop-up
      • Friend Reward Pop-up
      • FAQ
    • Manage advocate accounts
    • Review referrals
Powered by GitBook
On this page
  • Step 1: Log in to your PayPal account
  • Step 2: Enable PayPal Payouts
  • Step 3: Create your app
  • Step 4: Integrate with BixGrow
  1. OTHER SETTINGS
  2. Integration

PayPal

Settings > Integration > PayPal

PreviousMailchimpNextStaff accounts

Last updated 23 days ago

PayPal allows you to pay your affiliates in a few seconds. Before we begin, please remember that a PayPal Business Account is required for integration, and this integration does not offer automatic payouts. about PayPal Payouts.

All steps are compulsory and none should be skipped. A tutorial video can be found here.

Step 1: Log in to

Log in using your PayPal account's email address and password.

Here, click on Developer to access your PayPal Developer Dashboard.

Step 2: Enable PayPal Payouts

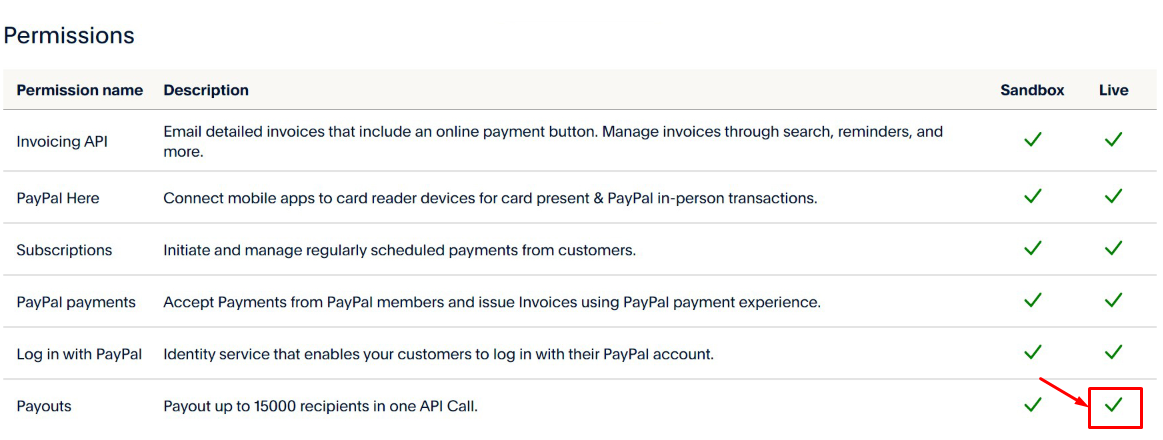
Visit My Account, scroll down, and click Enable in the Live column.

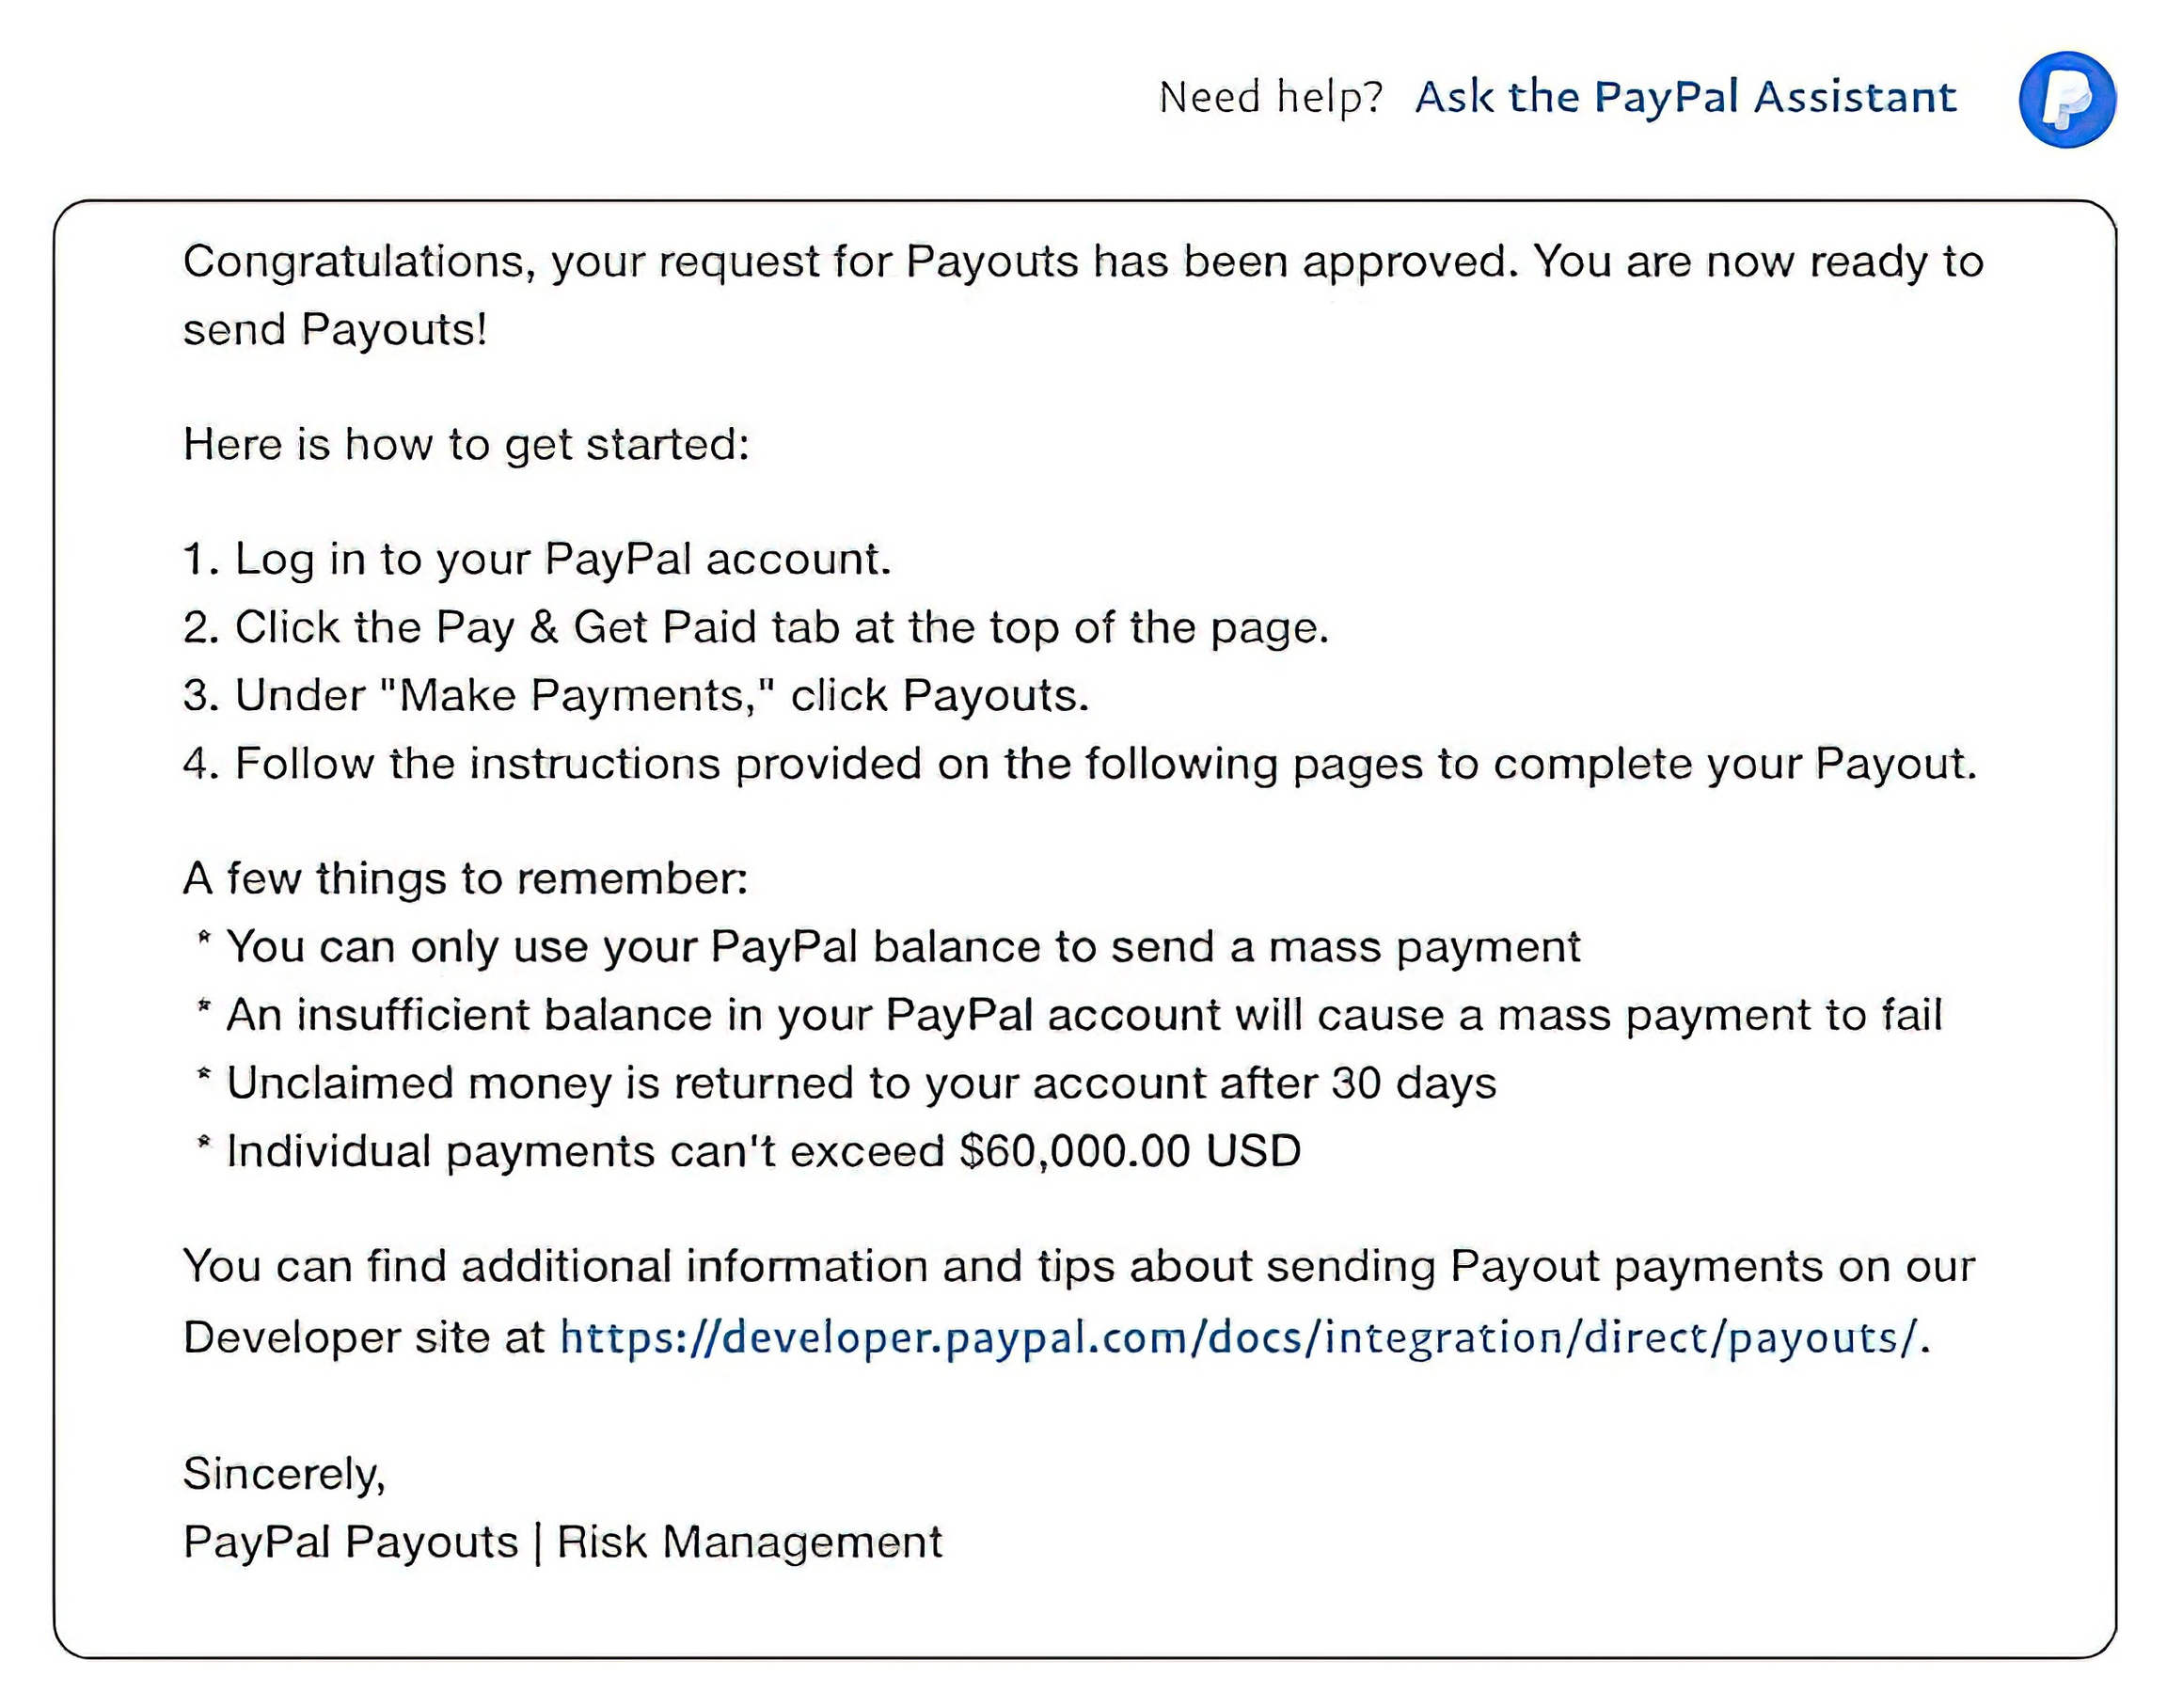
To get this certified, you need to contact PayPal (it can take from hours to days).

Based on your discussion with PayPal, they will send you an email to let you know that your request is being reviewed. Once you've been approved, the API will be marked with a check mark, indicating that the Payouts API is live.

Step 3: Create your app

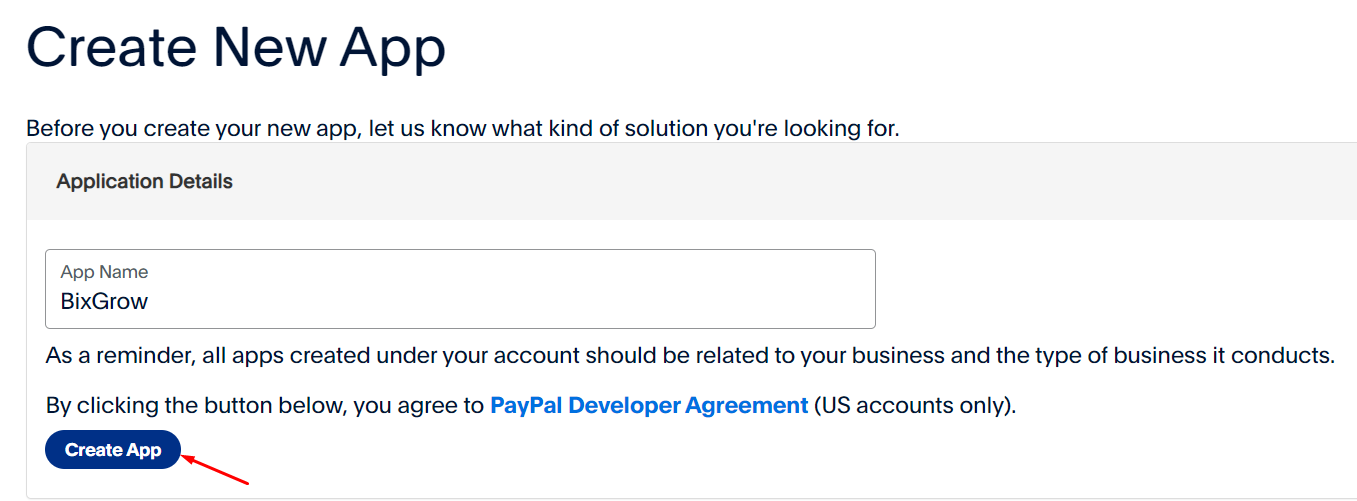
Go to Apps & Credentials, switch from Sandbox to Live mode, and then click Create App.

Keep in mind that you must switch to Live mode. If you don't, the credentials attained from the app you create will be deemed invalid.

Next, fill in the app name (BixGrow) and click Create App.

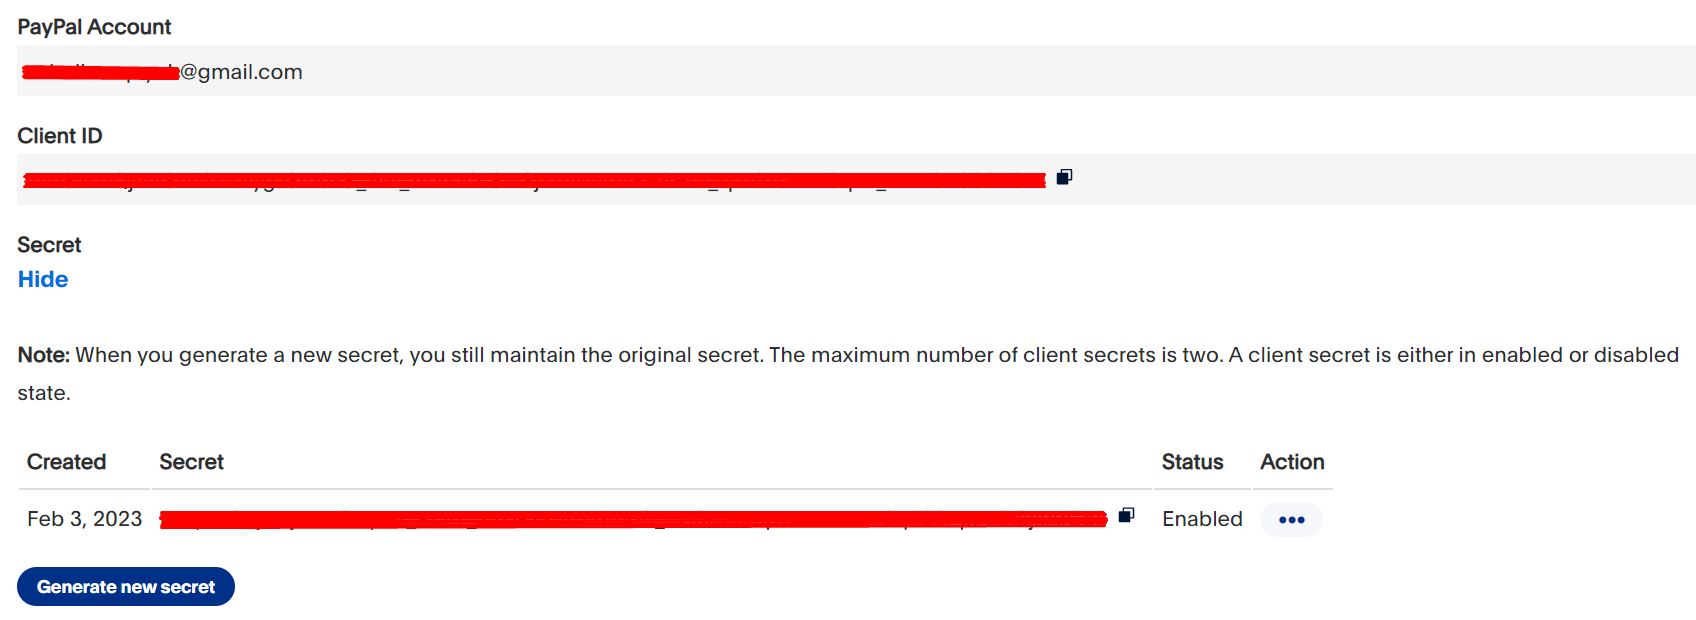
Now, you will see your Client ID and Secret, which will be used in the next step.

Step 4: Integrate with BixGrow

Return to BixGrow > Settings > Integration and click the Connect button.

Then, enter the Client ID and Secret in Step 3 and create a strong Payment Password that will be required to fill in when you process payments. It secures your credentials since we don't have access to your money. To keep your payouts safe, every access to your Payouts API will require this Payment Password.

This is where you set up a Payment Password dedicated to PayPal Payouts inside BixGrow only. Do NOT input your PayPal account's password.

For your own payment security, we don't have access to your Payment Password, nor can we retrieve it when it's lost or forgotten. If you don't remember it, you'll have to re-configure your Payouts API with BixGrow by entering your Client ID & Secret again and setting up a new Payment Password.

Also, tick on the two boxes to agree that our app will securely store your information and use these credentials to transfer money outside of your PayPal account. Finally, click Save.

You'll be redirected to the . On the Contact page, scroll down and click on Call us or Message Center > New Message, then initiate a chat with their team so they can assist you further.

PayPal Customer Service team
Learn more
your PayPal account